Showing posts with label dessert. Show all posts

Wednesday, May 14, 2014

Cherry Pie

Last week, we celebrated 4 years of marriage!  Time flies when you're having fun. :)

When thinking about an anniversary gift for my sweetie, I always start with the Hallmark list of annual anniversary gift ideas.  It at least gets the ball rolling for this indecisive, over-thinking mind of mine.  For Year #4, traditionally the gift is fruit or flowers.  A more modern gift would be an appliance.  I'll pass on the appliance since we moved into our house about 2 years ago, I think we are all set there.  Sticking with the theme, I decided to make something I knew he would love as part of his gift.

A cherry pie!


Wow, did I have a heck of time trying to find fresh tart cherries in May in Florida!  I couldn't even find frozen ones.  So, I resorted to canned tart cherries in water.  I'm sure fresh or frozen would have been a little better but we couldn't tell a difference.

Here is the inspiration for the pie decoration. :)


Here is how to make it:

Cherry Pie

Ingredients:

2 refrigerated pie crusts (I like Pillsbury.)
1/3 cup brown sugar
1/3 cup sugar
1/8 teaspoon cinnamon
3 Tablespoons cornstarch
4 cups sour or tart cherries
1/2 teaspoon vanilla
2 Tablespoons butter 
Milk & sugar for brushing top of pie

Directions:

Preheat oven to 400 degrees.  Spray a 9" pie pan with non-stick spray and line with one crust.  In a bowl, mix sugars, cinnamon and starch.  Gently stir in cherries.  Add vanilla and stir.  Pour mixture in pie pan lined with crust.  Dot top of cherry mixture with pats of butter.  Cover with top crust.  Cut off excess pie dough around the edges.  This can be used to make a decoration for the top of the pie.  Flute around the edge of the pie sealing the dough using the first finger from one hand between the first and middle finger from the other.  Gently brush a small amount of milk or beaten egg over the top of the pie.  Sprinkle with sugar.  Cut a few slits in the top for ventilation.  Bake for 1 hour checking near the end to make sure crust doesn't burn.

Best served with vanilla ice cream in my opinion!


Enjoy!

Happy Anniversary, babe :)

Monday, April 21, 2014

Easter M&M Cookie Bars

Happy *day after* Easter!

In their fright the women bowed down with their faces to the ground, but the men said to them, "Why do you look for the living among the dead? He is not here; he has risen!  Remember how he told you, while he was still with you in Galilee:  'The Son of Man must be delivered over to the hands of sinners, be crucified and on the third day be raised again.'"  Then they remembered his words.
Luke 24:5-8


In celebration of Easter/Resurrection Day, I made these tasty M&M Cookie Bars not once but twice!  The first time for my family and the second to share at church on Sunday.  They were a hit both times. :)


Here is the recipe.
I just switched out the regular M&Ms for pastel-colored ones.

I spent basically the whole day alone with my little guy.  My husband spent the day at his daughter's volleyball tournament...PS, when I find out who was in charge of scheduling a tournament on Easter Sunday, they will get a piece of my mind!  Anyway, my husband and I did get to out for a nice dinner Saturday evening to celebrate and I made the best of the day I had to spend with my little guy.

I started by making us (well, really just myself) Sticky Buns and an egg.  I may have had an extra cup of coffee or two or three...but I'll never tell!


Then, we served in the nursery at church surrounded by lots of little crawlers and toddling new walkers dressed their Sunday best.


After what seemed like a very short nap-time, we decorated real hard-boiled eggs, which my little guy preferred to throw because they looked more like balls then decorations.  I ended up having to retrieve one from underneath the stove with two pool sticks...


When dada got home, we set up a fun little egg hunt around the house.  He was so proud when he spotted a hidden one and loved splashing his little hands in the basket full of candy-filled eggs.


Overall, it was a good day.  I am thankful for the fragrant jasmine growing on my front gate, the day's cool weather, and the quality time spent holding and hugging my little guy.  But, I'm most of all grateful for a Savior who suffered and sacrificed while purposefully preparing the way to eternal life for all who believe.  What a journey for the precious Passover lamb.

Monday, March 10, 2014

Snickerdoodle Bread

Wow!  I mean, WOW!  This stuff is awesome!


My mom loves Snickerdoodle cookies so I knew she would love this twist on a old classic.  I made this bread and my first ever pot roast in the crock pot last time she came to visit.  We enjoyed this sweet bread in the morning with our coffee and during nap time with our coffee.  :)  Lots of coffee being consumed these days with a 16 month old even with a solid night's sleep...but that's a different story.  Moms of boys, are you with me?!

Back to this delicious bread...here is the recipe link.

Enjoy!

Monday, February 24, 2014

Apple-Pear Crisp with Peanut Butter

Funny story about this recipe...


The original recipe comes from the February 2014 issue of Good Housekeeping magazine.  It caught my eye right away when I saw the unique crisp topping made with peanut butter!  I had a few nights alone ahead of me and all the ingredients patiently waiting in my kitchen.  I halved the recipe and had dessert for myself for 3 nights!

The funny thing is...on a recent flight to Indiana, the woman next to me was reading the same magazine and I commented that I had just made this dessert!  She said she would think of me when she made it after she returned home.  Wonder if she tried it out and what she thought?


Here is how you can make it.  Let me know what you think!

Apple-Pear Crisp with Peanut Butter

Ingredients:

1/2 cup old-fashioned oats
3 small Gala apples, peeled and chopped
2 medium pears, peeled and chopped
1 Tablespoon water
2 teaspoons brown sugar
1/2 teaspoon ground cinnamon
1/2 teaspoon ground ginger
1/2 cup dried cranberries
1/3 cup chunky peanut butter
3 Tablespoons whole wheat flour
Vanilla ice cream

Directions:

Preheat oven to 375 degrees.  Spread oats in single layer on jelly-roll pan.  Toast 5-8 min or until golden brown, stirring once halfway through.

Meanwhile, in a 4-qt saucepan, combine apples, pears, water, sugar, cinnamon, and ginger.  Cook on medium for 10-12 min or until sugar dissolves and fruit softens, stirring occasionally.  Remove from heat.  Stir in cranberries.  Pour into a shallow 2 quart baking dish.

In a medium bowl, combine oats, peanut butter, and flour.  With fingers, rub to form small clumps.  Sprinkled over fruit mixture in baking dish.  Bake 15-20 minutes or until browned and bubbling.  Serve with a scoop of vanilla ice cream!

Serves 6.


Enjoy!

Wednesday, January 22, 2014

Vanilla Maple Pecan Cookies

This recipe belongs to a dear old friend.  I've been thinking about these cookies for quite some time but didn't have an excuse to make them until my girlfriend at church asked me to bring a batch of bars or cookies to share at our Christmas Eve Service.  And of course, I said "Yes"!

So, here they are...in all their splendor!


Here is how to make them:

Vanilla Maple Pecan Cookies

Ingredients:

Cookie:
1 cup shortening
1/2 cup margarine, softened
2 cups packed brown sugar
2 eggs
1 teaspoon vanilla extract
1 teaspoon maple flavoring (a little tricky to find, but it's out there!)
3 cups flour
2 teaspoons baking soda
2 cups white chocolate chips
1/2 cup chopped pecans

Frosting:
1/4 cup margarine, softened
4 cups powdered sugar
1 teaspoon maple flavoring
4-6 Tablespoons milk
1/2 cup pecan halves

Directions:

Preheat oven to 350 degrees.

In a mixing bowl, cream the shortening, butter, and brown sugar.  Add eggs, one at a time, beating well after each.  Beat in vanilla and maple flavoring.

In a separate bowl, combine the flour and baking soda.  Gradually add to the creamed mixture.

Stir in the white chocolate chips and pecans.

Drop by rounded tablespoonfuls, 2 inches apart onto non-greased baking sheets.  Bake for 8-10 minutes or until golden brown.  Cool for 2 minutes on cookie sheet before removing to wire racks to cool completely.

In a mixing bowl, cream butter and powdered sugar.  Beat in maple flavoring and enough milk to achieve a spreading consistency.  Frost cooled cookies and top each with a pecan half.

Note:  This recipe makes 7 dozen...yes, about 84 cookies so feel free to halve it if you need less.


Enjoy!

Monday, November 18, 2013

Cranberry Pistachio Biscotti

The holidays are upon us and I could not be more excited!  I LOVE this time of year.  Fall going into winter is by far my favorite of all the seasons.  It's filled with family and friends, festive gatherings, bright decorations, comforting food, and warm coffee!  Where there is warm coffee, there are tasty treats like this Cranberry Pistachio Biscotti.  Cozy up and enjoy!


Recipe can be found here.

The first time I made these was for our annual get-together with my high-school girlfriends around Christmas time.  All 8 of us are still close but as our families grow, it's harder and harder to get everyone together in one place.  We are also spread across 5 states!  So whenever I make these, it takes me back to one of those special times when we were all reunited.  Miss you girls!

Friday, August 16, 2013

Banana Hershey Bar Muffins

One afternoon I set out to make banana chocolate chip muffins.  After mixing all the ingredients together, I opened the drawer to pull out the bag of chocolate chips, but they were nowhere to be found!  Who is to blame?!  Was it my husband and kids who like to eat them right out of the bag or was it me who used them all in the last batch of chocolate chip cookies?!  Guess I should gather all my ingredients before I start baking...lesson learned.

Luckily, in that same drawer is where we keep the Hershey Bars for making s'mores so I chopped some of those up and added them in place of the missing chocolate chips.

That is how these Banana Hershey Bar Muffins were born. :)


Here is how to make them...


Banana Hershey Bar Muffins

Ingredients:

3/4 cup brown sugar, firmly packed
1/2 cup butter, softened
3 bananas, mashed
2 eggs
1 teaspoon vanilla
2 cups all-purpose flour
1 teaspoon baking soda
1/4 teaspoon salt
2 Hershey Bars, chopped

Directions:

Heat oven to 350 degrees.  Combine brown sugar and butter in larger mixer bowl.  Beat at medium speed until creamy, scraping bowl often.  Add bananas, eggs, and vanilla.  Continue beating until well mixed.

Combine flour, baking soda, and salt in a medium bowl.  Stir flour mixture into banana mixture just until moistened.  Gently stir in chopped Hershey Bar.

Spoon batter into greased muffin pans.  Bake about 18 minutes or until lightly golden brown.  Let stand 5 minutes before removing from pans.


Delicious but next time I'll add crushed graham crackers and tiny marshmallows make the flavor complete. :)

Enjoy!

Thursday, August 8, 2013

Blueberry Pie

If you LOVE blueberries, you've come to the right place!  I seriously eat them almost every single day!  Yep, it's true!  If you knew all of the awesome blueberry benefits, you might too! :)

I've made a few pies and put them on the blog, but surprisingly, this is the first debut for a Blueberry Pie and I can't wait to share it with you!  It's amazing!


Here are the sweet and juicy details...


Blueberry Pie

Ingredients:

4 cups fresh blueberries
3/4 cup sugar
3 tablespoons cornstarch
1/8 teaspoon cinnamon
2 tablespoons cold butter, cut into pieces
1 set of Pillsbury refrigerated pie crusts

Directions:

Preheat oven to 400 degrees.  Set out pie crusts at room temperature for about 15 minutes.

Line a 9-inch pie pan with one pie crust.  In a medium-sized bowl, mix sugar, cornstarch, and cinnamon.  Stir in the blueberries until well mixed.  Put the coated blueberries into the pan with the pie crust being careful to evenly distribute the sugar mixture.

Dot the top of the blueberries with the butter pieces and cover with the top crust.

Using a butter knife, cut off the excess dough around the edges.  You can make decorations for the middle of the pie with the excess dough if you choose.  Using your pointer finger from one hand between the first two fingers from your other hand, flute the crust sealing the edges.  Cut slits in the crust to vent.  Put the pie pan on a pie oven guard/drip protector in case of spillage.

Using a pastry brush, lightly wash the top crust with milk.  Sprinkle with sugar and bake for 50-60 minutes or until lightly browned.  Let the pie sit for at least 4 hours before cutting.


This pie is delicious by itself and even better warmed up with vanilla ice cream!

Enjoy!

Thursday, June 20, 2013

Oatmeal Toffee Cookies

Yes!  Finally!  Ask and you shall receive! :)


These cookies are always a hit and they go way back.  I would make these occasionally all the time when I was in high school.  I loved to bake even back then.  My friends and family never complained.  :)


I have to give a BIG shout out to my beloved high school girlfriends.  All 8 of us are still very close and try to get together a couple times a year even though we are spread across 5 states.  When we reunited, it's just like old times.  There is something deep about those friendships you make early on in life and have made a commitment to maintain over the years.  I love each of you very much and miss you everyday.  We have so many spooner memories I will cherish forever.  I hope you make these cookies and think about all the school days, weekends, and summer nights we spent living, exploring, and growing together.


Here is how to make them:

Oatmeal Toffee Cookies

Ingredients:

1 cup butter, softened (not melted)
2 eggs
2 cups brown sugar
2 teaspoons vanilla extract
1 3/4 cup all-purpose flour
1 teaspoon baking powder
1 teaspoon cinnamon
1/2 teaspoon salt
3 cups old-fashioned oats (not quick-cooking or instant)
1 package of Heath toffee bits (8-10 oz.) *You can usually find these near the chocolate chips at the grocery.

Directions:

Heat oven to 375 degrees.  Grease a cookie sheet.  Beat butter, eggs, brown sugar, and vanilla together.  Add the dry ingredients.  Add the oats and toffee bits.  Drop rounded tablespoon size balls onto the greased cookie sheet.  Bake 8-10 minutes.  I usually take them out after 9 minutes even though they don't look quite done.  Cool 1 minutes on the baking sheet then remove to a wire rack.  I use a thin, metal fish spatula to get them off the tray easily.  The toffee can be sticky until it cools to a chewy consistency so you may need to wipe the spatula off after each cookie removal.  Makes about 36 cookies.


Enjoy!

Monday, June 17, 2013

Zucchini Bread

So, my mom was in town last week, and I always like to bake something for her when she visits.  Last time, I made her this Rustic Blackberry Tart.  This time I thought Zucchini Bread sounded nice and summery.  It brings back memories from when I was little.  Mom would bake up some of this bread with fresh zucchinis from my dad's garden.  I don't have a garden so zucchinis fresh from Fresh Market will have to do!  My mom did help me plant some flowers in my new cute terra cotta pot and by our mailbox.  We also bought a majestic palm and planted it in a planter for by the pool!  Now, if I can just keep them alive!

Anyway, back to the Zucchini Bread...


Here is how I made it:

Zucchini Bread

Ingredients:

3 eggs
2 cups sugar
2 cups zucchini, shredded and drained
1 cup vegetable oil
2 teaspoons vanilla extract
3 cups flour
1 teaspoon salt
1 teaspoon baking soda
1 teaspoon baking powder
2 teaspoon cinnamon
1/2 teaspoon nutmeg
1/4 teaspoon ground clove
1/2 cup nuts, chopped

Directions:

Beat eggs until foamy.  Stir in sugar, zucchini, oil, and vanilla.  Gradually add dry ingredients and spices.  Stir in the nuts.  Pour into 2 bread pans greased only the bottoms.  Bake at 325 degrees for about 50 minutes or until a toothpick inserted in the center comes out clean.  Cool at least 10 minutes.  Remove from pans.


Enjoy!

PS - I used chopped walnuts in this bread and they were really good.  You could use pecans instead but I didn't have any on hand after my last use of them while making these Chewy Almond Toffee Bars!  Oops!

Thursday, June 6, 2013

Chewy Almond Toffee Bars

I love flipping through magazines but I don't like to have too many sitting around because it makes me feel bad if I don't get to time read them.  Weird, I know.  Anyway, I just happened to pick up a Food Network Magazine while in line at the grocery store and found a delicious-looking recipe for Chewy Toffee Bars by Jamie Deen, who is Paula Deen's son (like you didn't already know that)!  I set out to make these one afternoon only to have a major baking fail.  :(  I was in the middle of toasting the pecans when I heard my little guy stirring in his room after one of those dreaded short naps.  I thought, "oh, the pecans will be fine while I run in there to check on him real quick".  Well, my visit to his room took longer than expected and then I began to smell a more than toasted pecan.  Burnt to a crisp is more like it.  Since I was already half way through the recipe, I raided my pantry looking for a substitution when I found slivered almonds!  Perfect!  And so, these Chewy Almond Toffee Bars were born. :)


Here is how I made them:

Chewy Almond Toffee Bars

Ingredients:

cooking spray
1 1/2 sticks unsalted butter
2 1/4 cups packed light brown sugar
2 cups all-purpose flour
2 teaspoons baking powder
pinch of salt
3/4 cup slivered almonds, chopped
2 large eggs
2 teaspoons vanilla extract
1 cup toffee pieces

Directions:

1.  Preheat oven to 350 degrees.  Spray an 8-inch square baking dish with cooking spray and line the bottom and sides with parchment paper.  Spray parchment with cooking spray.

2.  Melt the butter in a medium saucepan over medium heat; add the brown sugar and stir until melted.  Let cool 5 minutes.

3.  Meanwhile, whisk the flour, baking powder and salt in a medium bowl.  Toast the almonds in a medium skillet over medium heat, 6 to 8 minutes (watching carefully so they don't burn!); remove to a plate.

4.  Stir the eggs, one at a time, into the cooled butter-sugar mixture, then stir in the vanilla.  Add the flour mixture and stir until combined.  Fold in the toffee pieces and toasted almonds.  The batter will be very thick.

5.  Spread the batter in the prepared baking dish.  Bake until golden brown and a toothpick inserted into the center comes out clean, about 45 minutes.  Let cool 15 minutes, lift out of the pan and cut into pieces.

* I wrapped each individually so they would stay fresh longer and I could easily take them to share at church on Sunday!


Enjoy!

Friday, May 17, 2013

Big Fin Signature Dessert

Oh my gosh!  I mean OH MY GOSH!


This has to be one of my all time favorite desserts served at a restaurant.  I just had to share it with you.  It lands right up there with Fleming's Chocolate Lava Cake!  But I think this one might be a teeny bit better.

You might remember me mentioning that my husband and I celebrated our anniversary last week and were able to enjoy a nice dinner out.  Well, we went to Big Fin Seafood Kitchen for one reason and one reason only...this dessert!  I mean they have the freshest seafood around but they also have this dessert!


It's called the Big Fin Signature Dessert ~ "a milk chocolate cup loaded with a gooey brownie and vanilla ice cream, drizzled with caramel sauce, topped with pecans and whipped cream"!  Wowza!


I'm apologize for tempting you (with these iPhone photos) because I don't have the recipe for this amazing creation.  I so wish I did, but I guess we'll just have to visit Big Fin to indulge.

PS - Don't tell our kids we went there and had this!  They will never forgive us!

Friday, May 10, 2013

Peanut Butter Pie

The words peanut butter and pie combined should be illegal!  While making it, I knew it was going to be over the top rich and sweet-tooth satisfying.  After one bite, my suspicions were confirmed.  It was ahhhmazing!


I've had Miranda Lambert's recipe from Good Housekeeping Magazine in my drawer for a while now just waiting for the perfect occasion.  (If Blake and Miranda love it, we will too, right?!)  My husband and I celebrated our 3rd anniversary this week and he loves peanut butter and pie.  So, I finally had the perfect occasion!


The night before we got to enjoy a quiet late dinner out while the older kids stayed home with the sleeping baby.  Thank you!  So on the night of, we stayed in and grilled out, one of our favorite things to do!  My awesome hubby picked up the food from Fresh Market.  I love when he goes to the store because he always come back with surprises.  We had turkey burgers (which were actually Greek chicken burgers because the guy behind the counter grabbed the wrong ones, ha!), mozzarella tomato stacks, and sweet potato tortilla chips along with some vino and this pie for dessert.  A great anniversary dinner at home in my mind. :)


The best thing about baking a pie is sneaking a piece the next afternoon with a cup of coffee while the baby naps!  hehe ;)

Here's the recipe!

Peanut Butter Pie

Ingredients:

1 9 inch refrigerated ready-to-use pie crust
3/4 cup sugar
1/3 cup cornstarch
1 teaspoon salt
4 cups whole milk
4 large egg yolks
3/4 cup chunky peanut butter
3 tablespoons butter, room temperature
1 tablespoon vanilla extract
whipped cream and chopped peanuts for serving

Directions:

Preheat oven to 450 degrees.  Place pie crust in 9 inch pie plate and bake according to directions for one pie crust shell.

In a 3 or 4 qt saucepan, stir together sugar, cornstarch, and salt.  In large bowl, whisk milk and egg yolks until blended; gradually whisk into sugar mixture.  Heat on medium for 6-7 minutes or until mixture thickens and boils, stirring constantly.  Boil 1 minutes, stirring.  Remove from heat and stir in peanut butter, butter, and vanilla until well blended.

Immediately pour peanut butter mixture into baked pie shell, press plastic wrap onto surface of filling and refrigerate pie for at least 4 hours or until well chilled and set.

Serve topped with whipped cream and garnish with chopped peanuts.

I love you babe.  Cheers to a great 3 years and many more to come!

PS ~ If you love pie, check out my Grandma's Strawberry Pie and Butterscotch Pie!

Tuesday, April 30, 2013

Dark Chocolate Coconut Blossoms

Before I made these, I should have found out if my family liked coconut.  Turns out...they don't.  :(  But oh well!  To each their own and more for me!  And believe me, I had my fair share of these delicious little Dark Chocolate Coconut Blossoms!  One evening I even warmed two up and put some vanilla ice cream on top!  Yummo!


Here's how I made them:

Dark Chocolate Coconut Blossoms

Ingredients:

1/3 cup all-purpose flour
2 1/2 cup flaked sweetened coconut
1/8 teaspoon salt
2/3 cup sweetened condensed milk
1 teaspoon vanilla extract
18 dark chocolate Hershey's Kisses

Directions:

Preheat oven to 350 degrees.  Grease a cookie sheet.

In a large bowl, stir flour, coconut, and salt.  Add condensed milk and vanilla; stir until well combined.

Drop batter in about a tablespoon size balls an inch apart onto the cookie sheet.  Bake 15-17 minutes until done with golden bottoms.

As soon as they come out of the oven, add a dark chocolate Hershey's Kiss to the top and press down slightly.  Let cool about 5 minutes on the cookie sheet then transfer to a wire rack.  Makes 1 1/2 dozen.


If you like coconut, you will love these!  I did!  Next time, I'm thinking about adding an almond on top to make an Inside-Out Almond Joy!  Wouldn't that be amazing?!


Enjoy!

Original macaroon recipe adapted from Good Housekeeping Magazine

Thursday, April 18, 2013

Lemon Cupcakes with Vanilla Buttercream Frosting

Simply Self Storage is celebrating their 10 year anniversary this week!


When I saw these Homemade Lemon Cupcakes with Vanilla Frosting from Sally at Sally's Baking Addiction, I knew I had to make them for the party week!


Their light vanilla lemonie flavor is perfect for spring, and the yellow hue with blue sprinkles is the perfect color match for Simply SS!


I doubled Sally's recipe to make 24 cupcakes but still baked them a dozen at a time.  For the frosting, I made one batch plus another half.  I knew it would make way too much if I doubled it, and I still had some leftover!  But that's OK because it's stored in the refrigerator for snacking with pretzels or graham crackers.  :)

Check out the link above for the full Lemon Cupcake and Vanilla Buttercream Frosting recipe!  As a side note, when creaming the butter and sugar together for the cupcakes, make sure you beat the mixture for the full 2-3 minutes.  It will end up looking like whipped butter.  Also, only fill the cupcake liners about 3/4 of the way full or they will overflow...at least mine did.


Happy 10 Year Anniversary to Simply SS and congrats to my husband on all his hard work!

Wednesday, April 10, 2013

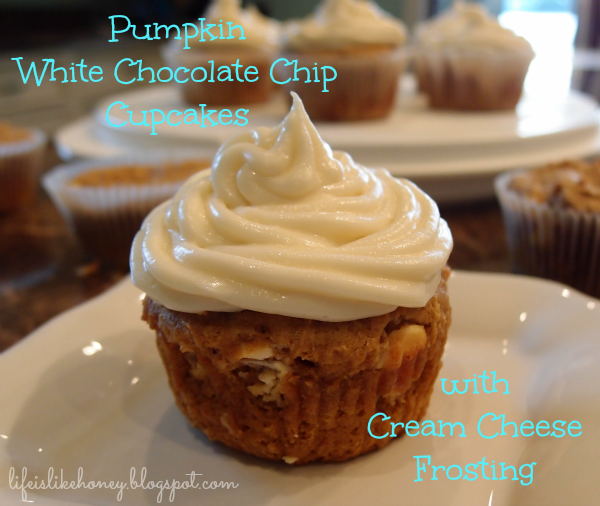
Pumpkin White Chocolate Chip Cupcakes with Cream Cheese Frosting

Ok, ok, I know it's not fall but I could not stand looking at the lone can of pumpkin pie mix in my pantry any longer.  I remember seeing a recipe where you combine only yellow cake mix and a can of pumpkin to make supposedly a moist cupcake.  I decided to give it a try but with a twist by using pumpkin pie mix instead of plain pumpkin and adding in these little babies...white chocolate chips!


Pumpkin White Chocolate Chip Cupcakes with Cream Cheese Frosting

CUPCAKES

Ingredients:

1 box (18.25oz) Duncan Hines Classic Yellow Cake Mix
1 can (15oz) pumpkin pie mix
1 cup Ghirardelli White Chocolate Chips
Yes, these are the only ingredients you'll need!

Directions:

Preheat oven to 350 degrees.  Line muffin pans with cupcake liners and spray them lightly with non-stick spray.  Combine the cake mix and pumpkin pie mix in a mixer until fairly smooth.  Stir in the white chocolate chips.  Fill each cup about 2/3 full.  These cupcakes won't rise too much but will be soft and moist inside!  I got 22 average size cupcakes from this batter.  Let them cool completely before frosting.

FROSTING

Ingredients:

12 oz reduced fat cream cheese, softened
1/2 cup unsalted butter, softened
2 1/4 cup powdered sugar, sifted
2 teaspoons vanilla extract
pinch of salt

Directions:

Cut the softened (not melted) butter into chunks and cream together with the cream cheese.  Add in the vanilla and mix.  Gradually add in the sifted powdered sugar until combined then add a pinch of salt to cut the sweetness.  Beat on medium until creamy.  Your frosting should be a room temperature when topping your cupcakes.  Store any leftover in the refrigerator and use for dipping graham crackers (yum)!


These are like a mix of pumpkin and spice cake all in one little treat.  And, the homemade cream cheese frosting is the perfect match!  Try this easy recipe now for a little taste of fall or Pin It and save it for later!

Linking up at Semi Homemade Mom!

Monday, April 8, 2013

The Best Banana Bread Ever!

Don't throw out your ripe bananas!  Make banana bread!  You must try this recipe!


It really is The Best Banana Bread Ever!  I've tried many different recipes.  They are all too dry, too hard, too chewy, or too bland.  But, not this one!  This one is perfectly moist and has a yummy banana-ie sweetness.


I can't wait to share it with you!  Here it is!

The Best Banana Bread Ever

Ingredients:

1 cup brown sugar
1 1/8 cup white sugar
1 1/2 cup shortening (like Crisco)
3 cups all-purpose flour
1/4 teaspoon salt
1/2 teaspoon cinnamon
3/4 teaspoon baking soda
3 eggs
6 tablespoons milk (I used whole this time because I had some leftover.)
1 teaspoon vanilla extract
1 cup ripe bananas, mashed (about 2 medium-sized)

Directions:

Preheat oven to 350 degrees.  Line your bread pan(s) with wax paper, spray with non-stick spray, and lightly dust the bottom with flour.

With a mixer, cream together the brown sugar, white sugar, and shortening.  In a separate bowl, mix the baking soda, eggs, milk, and vanilla.  After mixing well, add to the creamed mixture.  In another bowl, sift together the flour, salt, and cinnamon.  Add flour mixture to the creamed mixture.  Mix just until combined.  Do not over mix from this point forward.  Fold in the mashed bananas.  Pour the batter into loaf size baking pan(s).

Bake for about 50 minutes or until an inserted toothpick comes out clean.  Let cool for at least 30 minutes.  Run a butter knife around the edge to loosen the loaf.  Carefully flip the pan over onto a plate or flat surface and let the loaf gently fall out.  Peel off the wax paper and flip the loaf back over to right-side up.  Slice with a serrated knife and enjoy!  Makes 2 loaves or 1 larger loaf.

I prefer mine warmed up with butter and honey!

Related Posts Plugin for WordPress, Blogger...